
The Ultimate Guide to Tile Injection for Drummy Tiles
No mess, no need to leave your home
Ready to walk on in 2-4 hours
7 year guarantee
5000+ happy customers
Est. 2015
Everything you need to know about fixing drummy tiles using our under tile injection system
Do you have loose, drummy or tenting tiles?
If you've discovered drummy or loose tiles in your home, it can be a daunting prospect when considering your options to fix the problem. Tile injection is the most cost-effective and fastest solution, saving you significant cost compared to retiling, as well as completing the job in just 3-4 hours instead of 2-3 weeks.
This comprehensive guide covers everything you need to know about tile injection, from understanding what causes drummy tiles to getting your floor repaired and back to normal the same day.
In This Guide (click to jump)
This video shows what causes drummy tiles and what your options are to have them fixed the most efficient way possible
SECTION 1. What Causes Drummy Tiles?
Common Causes of Drummy Tiles
De-Laminated —also called 'drummy' or 'hollow' tiles—occur when the bond between your tiles and the substrate (the surface underneath) fails. When you tap on a drummy tile, it makes a distinctive hollow sound, indicating there's an air gap or void beneath it.
Poor Initial Installation
The most common cause of drummy tiles is inadequate adhesive application during the original installation. This includes:
-
Insufficient adhesive coverage: When installers don't apply enough tile adhesive, air pockets form beneath the tiles
-
No back-buttering: Professional installers should apply adhesive to both the substrate AND the back of each tile. Skipping this step leaves gaps
-
Wrong adhesive type: Using interior adhesive for outdoor tiles, or flexible adhesive on rigid substrates causes bonding failures
-
Improper substrate preparation: Installing tiles on dusty, damp, or uneven surfaces prevents proper adhesion
Natural Movement and Settlement
Even perfectly installed tiles can become drummy over time due to:
-
Building settlement: New homes settle in the first 5-10 years, causing minor substrate movement
-
Substrate flexing: Timber floors expand and contract with humidity changes, potentially breaking the tile bond
-
Concrete slab movement: Concrete can shift, crack, or heave due to ground movement or tree roots
-
Thermal expansion: Large temperature variations cause tiles and substrate to expand/contract at different rates
Water Damage and Moisture
Water infiltration can be a contributor to tile delamination:
-
Plumbing leaks: Hidden leaks beneath floors can dissolve adhesive over time
-
Poor waterproofing: Bathrooms and wet areas need proper waterproof membranes. Without them, water seeps through grout and breaks down adhesive
-
Rising damp: Ground moisture can wick up through concrete slabs, weakening adhesive bonds
-
Flooding events: flooding can compromise tile adhesive by breaking down the adhesive through excess water ingress.
Age and Adhesive Degradation
Older installations naturally deteriorate:
-
Adhesive breakdown: Tile adhesives have a service life of 15-30 years. Beyond this, chemical breakdown occurs
-
Grout deterioration: As grout cracks and crumbles, water can penetrate and attack the adhesive
-
Original low-quality materials: Cheap adhesives used in 1990s-2000s installations are now failing


How to identify drummy tiles
The Tap Test: Use a golf ball, screwdriver handle, or your knuckles to gently tap tiles across your floor. Listen carefully:
✅ Solid sound: A solid "thud" indicates proper bonding
❌ Hollow sound: A hollow, echo-like sound means the tile is drummy
⚠️ Cracking sound: If you hear cracking, there may be grout under the tiles and the tile may be ready to crack and should be repaired ASAP
Visual Inspection: Look for these warning signs:
• Cracked or crumbling grout lines
• Tiles that "tent" or lift in the middle
• Tiles that move or rock when stepped on
• Cracks radiating from corners
SECTION 2: YOUR OPTIONS WHEN YOU FIND DRUMMY TILES
When you discover drummy tiles, you have three main repair options. Here's an honest comparison to help you make the best decision for your situation:
Option 1: Tile Injection (Recommended)
Tile injection involves pumping professional-grade adhesive underneath drummy tiles through small holes drilled in the grout lines. The adhesive fills voids and re-bonds tiles to the substrate.
Option 2: Retiling
Complete removal of existing tiles and installation of new tiles. This involves demolition, substrate preparation, new tile purchase, and professional installation.
Option 3: Complete Floor Replacement
Removing tiles entirely and installing a different flooring type (timber, vinyl, carpet, etc.).
Compare your options

Cost Savings: Save thousands compared to retiling. For landlords managing multiple properties, this can mean the difference between profitable and unprofitable maintenance.
Speed: Same-day completion means tenants don't need to relocate, businesses don't close, and homeowners don't live in construction zones for weeks.
Preserve Your Tiles : If you have quality tiles in good condition, why replace them? Tile injection keeps your existing flooring while solving the underlying problem.
Environmental Benefits: Retiling sends tonnes of perfectly good tiles to landfill. Tile injection is the sustainable choice.
No Matching Issues: If your tiles are discontinued (common with tiles 10+ years old), retiling means replacing ALL tiles in the room or accepting a patchwork look. Tile injection preserves your original tiles.
Why Tile Injection is the best solution
How tile injection works
What's going on under there?
When Re-Tiling might be the better choice
While tile injection is ideal for 90% of drummy tile situations, retiling may be preferable if:
• More than 40% of tiles are cracked or broken (not just drummy)
• You're planning a full renovation and want a style update
• The substrate has major structural issues requiring replacement
• Water damage has compromised the substrate integrity
• You genuinely want different tiles or flooring
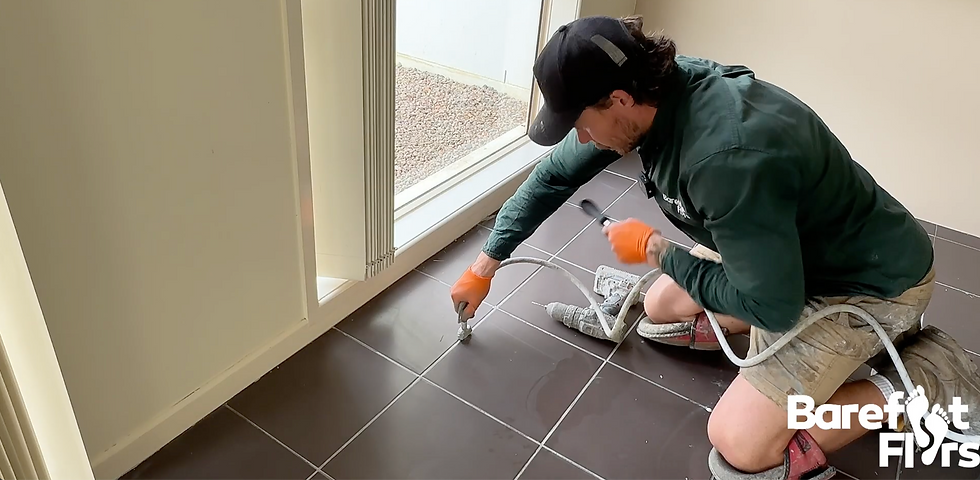
Section 3: HOW DOES TILE INJECTION WORK? STEP-BY-STEP PROCESS
Step 1: Initial Inspection & Assessment
Step 5: Finishing & Clean-Up
Final touches for a professional finish:
-
Grout Filling: Access holes filled with matching grout color
-
Grout Smoothing: Filled holes leveled flush with existing grout
-
Surface Cleaning: Complete cleanup of any adhesive residue
-
Final Inspection: Tap test confirms all tiles are now solid
-
Debris Removal: All materials and waste removed from site
-
When we leave, your floor looks virtually untouched except for small grout fills that blend in.
Understanding the tile injection process helps you know what to expect when our technicians arrive. Here's exactly how we repair your drummy tiles:
Step 2: Drill holes in grout line to find the 'void' underneath
Step 3: Tile Injection begins
Once the quote is accepted and we are on site- first step is to drill small access holes for adhesive injection:
-
Holes are 2-3mm diameter (smaller than a pencil)
-
Drilled precisely in grout lines (never through tiles)
-
Strategic placement ensures even adhesive distribution
-
Typically 1-2 holes per drummy tile depending on size
-
Minimal noise and dust
This is where the magic happens:
-
Specialized Equipment: Professional injection guns pump adhesive at controlled pressure
-
Premium Adhesive: We use commercial-grade tile injection adhesive manufactured specifically for our system.
-
Systematic Approach: Injection proceeds methodically to ensure complete void filling
-
Flow Monitoring: Technicians monitor adhesive flow through adjacent holes to confirm complete coverage
-
Pressure Control: Precise pressure prevents tile lifting while ensuring thorough penetration
Our adhesive creates a stronger bond than the original installation in most cases.
Step 4: Curing Time
The adhesive needs time to cure and achieve full strength:
-
Initial cure: 3-4 hours - Safe for light foot traffic
-
Full cure: 24-48 hours - Ready for heavy use and furniture
-
Complete bond: After 48 hours
-
During initial cure, you can walk normally on the floor but should avoid dragging heavy furniture or high-impact activities. We will point out any specific areas that you should avoid for longer.
🔬 THE SCIENCE BEHIND TILE INJECTION
Our technician performs a comprehensive floor inspection:
-
Taps every tile to identify all drummy areas (not just the ones you've noticed)
-
Maps affected areas and calculates total square meters
-
Provides on-site quote based on actual affected area
-
Explains the process and answers your questions
Tip: This is your opportunity to ask any questions about the process, timeline, or outcome.
Why does it work so well?
Professional tile injection adhesive is engineered specifically for this application:
• Low Viscosity: Thin enough to flow into hairline gaps and voids
• High Bond Strength: Creates tensile strength exceeding original adhesive (often 2-3x stronger)
• Flexibility: Accommodates natural substrate movement without delaminating
• Moisture Resistance: Won't break down from water exposure
• Longevity: 7 year warranty when properly applied
Our adhesive is NOT the same as DIY kits from hardware stores. Professional-grade injection adhesive might cost a little more than an off the shelf product but the performance difference is dramatic.
SECTION 4: BENEFITS FOR HOMEOWNERS
⚡ SAME-DAY COMPLETION
Your floor is repaired and usable the same day. No weeks of:
• Living in a construction zone
• Using makeshift bathroom arrangements
• Dust and debris throughout your home
• Contractors coming and going
• Waiting for materials to arrive
✨ KEEP YOUR EXISTING TILES
Preserve the original look of your home:
• Maintain aesthetic continuity with adjoining rooms
• Keep quality tiles you love
• No hassle finding matching discontinued tiles
• Preserve period features in heritage homes
🏠 MINIMAL DISRUPTION
Live normally during and after repair:
• No need to move out
• Furniture stays in place (just move items as needed)
• Minimal noise (just some drilling)
• No demolition dust spreading through house
• No bathroom closure for days/weeks
🛡️ SAFETY IMPROVEMENT
Drummy tiles are a safety hazard:
• Trip hazard: Loose tiles can rock or lift, causing falls
• Breaking risk: Drummy tiles crack easily under weight creating dangerous sharp edges
• Water pooling: Loose tiles allow water to seep underneath, creating slip hazards
Tile injection restores structural integrity and eliminates these risks.
🌱 ENVIRONMENTALLY FRIENDLY
The sustainable repair choice:
• Zero waste: No tiles sent to landfill
• No new manufacturing: Doesn't require energy-intensive tile production
• Minimal materials: Only adhesive used (vs. tiles, adhesive, grout, waterproofing)
✅ LONG-LASTING RESULTS
This isn't a temporary fix:
• 7-year warranty on all injected areas
• Often stronger than original installation
• Resistant to moisture and movement
• Guaranteed workmanship
SECTION 5: BENEFITS FOR LANDLORDS
🏃 MINIMIZE VACANCY
-
Retiling timeline: 2-3 weeks (tenant must vacate)
-
Tile injection timeline: 3-4 hours drying time (tenant stays)
-
No need to move out furniture
😊 IMPROVE TENANT SATISFACTION
Happy tenants renew leases. Tile injection means:
-
No relocation stress: Tenants don't need to move out temporarily
-
Minimal disruption: Work completed in single day
-
Fast response: Shows you care about maintenance issues
-
Professional service: Clean, efficient repair
⚠️ ELIMINATE LIABILITY RISKS
Drummy tiles create legal exposure for landlords:
Safety hazards you're liable for:
-
Tenant injury from tripping on loose tiles
-
Tenant injury from broken tile shards
-
Child injury in family properties
-
Elderly tenant falls
📋 PASS BUILDING INSPECTIONS
-
When selling or refinancing, building inspections flag drummy tiles:
-
Sale impact: Buyers negotiate 2-5% price reduction for "major defects"
-
Finance impact: Banks may reduce LVR if significant defects present
-
Insurance: Some insurers won't cover known defects
🔧 EASY PROPERTY MANAGER COORDINATION
-
We work with property managers to get the best result, with no fuss
-
We arrange access direct with tenants
-
No need to arrange accommodation for tenants
-
Fixed cost quotes good for 30 days, no surprise costs!


Case Study
Client: Property investor with 12 rental properties on Gold Coast
Issue: 7 properties had drummy bathroom tiles discovered during routine inspections
Option 1 - Retiling:
• Cost per property: $4,500 (average)
• Total cost: $31,500
• Vacancy: 2 weeks per property = $7,000 lost rent
• Tenant disruption: 7 relocations coordinated
• Total impact: $38,500
Option 2 - Tile Injection (Chosen):
• Cost per property: $1,100 (average)
• Total cost: $7,700
• Vacancy: $0
• Tenant disruption: Minimal
• Total impact: $7,700
Result: $30,800 saved | Zero vacancy | Happy tenants | All 7 properties back to full safety compliance in 2 weeks.
SECTION 6:
FAQ
Frequently asked questions

Section 7: Our Process
STEP 1: Contact Us
Multiple easy ways to reach us:
📞 Phone: Call 0407 898 795 for immediate response (Mon-Fri 8am-5pm)
💬 Online form: Fill out the enquiry form at the bottom of this page
Information that helps us quote accurately:
• Your location/suburb (we service Brisbane, Gold Coast, Sunshine Coast, Darwin, Mackay)
• Type of property (house, unit, commercial)
• Affected room(s) (bathroom, kitchen, living area, etc.)
• Approximate number of drummy tiles (if known—we'll verify)
STEP 2: Phone Consultation (5-10 minutes)
We'll have a quick conversation to understand your situation:
• Confirm symptoms: What makes you think tiles are drummy?
• Discuss scope: Size of affected area
• Determine most suitable specialist nearest to you
• Our specialist will contact you to schedule an exact time and date
STEP 3: Free Onsite Assessment
What happens during the assessment:
• Comprehensive tap test: We test EVERY tile in the affected area, not just obvious ones
• Map affected tiles: Create diagram showing which tiles need attention
• Take photos: Document current condition
• Answer your questions: Explain what we found and recommended approach
Duration: 15-30 minutes depending on area size
Cost: FREE, no obligation
STEP 4: Receive Detailed Quote
Your quote includes:
• Fixed price: Exact total cost, not an estimate
• Scope of work: Number of tiles to be treated (sqm)
• Warranty: What's covered
• Payment terms: When payment is due
Quote validity: 30 days (gives you time to consider, tiles may get worse if not treated ASAP)
Quote format: Emailed PDF
STEP 5: Decide at Your Pace
No pressure sales tactics. Ever.
Take your time to:
• Review the quote
• Discuss with family/property manager
• Check our reviews and references
• Ask additional questions
STEP 6: Book Your Repair
When you're ready to proceed:
• Accept quote via email, phone, or online
• Schedule convenient date/time
• Receive booking confirmation
• Get pre-job reminder when our specialist is on the way
STEP 7: Repair Day
What to expect:
• Arrival window: We'll arrive at our scheduled time, or let you know if we are running late
• Quality checks: Tap test all tiles after injection
• Clean finish: Leave area cleaner than we found it
• Walkthrough: Show you the results, explain curing timeline
STEP 8: Payment & Follow-Up
Payment:
• Due upon completion
• Methods accepted: Bank transfer, credit card
• Invoice provided immediately
• Receipt for tax/insurance purposes
SECTION 8: REAL CUSTOMER SUCCESS STORIES
Click below to read about how we helped these businesses save money and headaches through tile injection


Contact Us for a FREE Inspection & Quote!

DISCOVER
.png)
